Wabbajack
Wabbajack is an automated modlist installer, it will allow you to install the entirety of Viva New Vegas Extended in a matter of minutes and with extras such as better LOD and decompressed plugins.
Before you proceed with using Wabbajack, make sure to read the Introduction and Setup portions of the guide.
Only Steam and GOG copies on Windows are supported by the Viva New Vegas Wabbajack.
Installation
- Download the latest Wabbajack.
- Create a new folder anywhere outside of any Windows system folders, and the Root folder.
i.e.
C:\Modding\Wabbajack - Place the downloaded Wabbajack.exe in this folder, then run it.
- Click Browse Modlists, then locate Viva New Vegas in the gallery and click the download button in the corner.
- In Installation Location select an empty folder that is NOT the following:
- The Steam folder,
- Any Windows system folders,
- The Root folder,
- The folder where you put
Wabbajack.exe
- Begin the installation.
- Accept the Nexus Mods API request.
- If you are not a Premium user you will need to manually click Download for each mod.
- Once complete, the installation will show a green Installation Complete screen.
The installation process failed!
If you see a red Installation Failed screen, try log-in again through the Wabbajack settings, then reinstall the list to the same folder. If that doesn't work please join our Discord server for support.
Post-Installation
Exclusions
This operation is required because Windows can block MO2 and mod files from loading due to how MO2's virtualized filesystem works. It's not part of the manual guide because exclusions are handled by the MO2 installer, which Wabbajack doesn't use.
- Open Windows Security.
- Open Virus & threat protection.
- Click Manage settings under Virus & threat protection settings.
- Scroll down and click Add or remove exclusions under Exclusions.
- Add a Folder exclusion and point it to your Installation Location.
Root Mods
- In your Installation Location, open the Files Requiring Manual Install folder.
- Copy everything to the game's Root folder.
- Still in the game's Root folder, double-click on FNVpatch.exe to run it.
-
A Terminal window will open and it should say:
FalloutNV.exe patched! -
Close the Terminal and a file named
FalloutNV_backup.exeshould appear in the game's Root folder.
BSA Decompressor
Decompresses the vanilla BSA files to reduce loading times and stuttering. Can also fix certain sound effects not playing. 1. In your Installation Location, open the BSA Decompressor folder. 2. Run FNV BSA Decompressor.exe. - The Fallout: New Vegas and Decompressed Archives paths should be filled by default (The Root folder and Data folder respectively). If they aren't, close the program and re-run your game launcher to generate the required registry key, 3. Click Decompress, wait for the process the finish, then exit the program once finished.
Mod Organizer 2 Setup
- Launch
ModOrganizer.exefrom your Installation Location. - If you see a pop-up called Register?, select Yes.
Game Settings
- Open the game launcher using the Fallout Launcher option in MO2.
-
Inside the launcher, click Options and do the following:
-
Select the Ultra Preset.
If you have a very weak computer, or you'd prefer to prioritize battery life, you can select the Medium preset instead.
-
Set Resolution to your monitor's native resolution.
My monitor's resolution isn't listed
If you can't find the right resolution in the launcher's list, do the following:
- Close the launcher.
- Click the button in the MO2 toolbar and select INI Editor.
- Select the
FalloutPrefs.initab. - Change the following settings in the Display section:
iSize W= Your display's horizontal resolution.iSize H= Your display's vertical resolution.
-
-
Close the launcher.
Performance Guide
An in-depth guide on how to fix the game's lackluster performance, display issues and alt-tabbing. Covers topics such as DXVK, framerate limiting, display modes, lag and HDR.
Running The Game
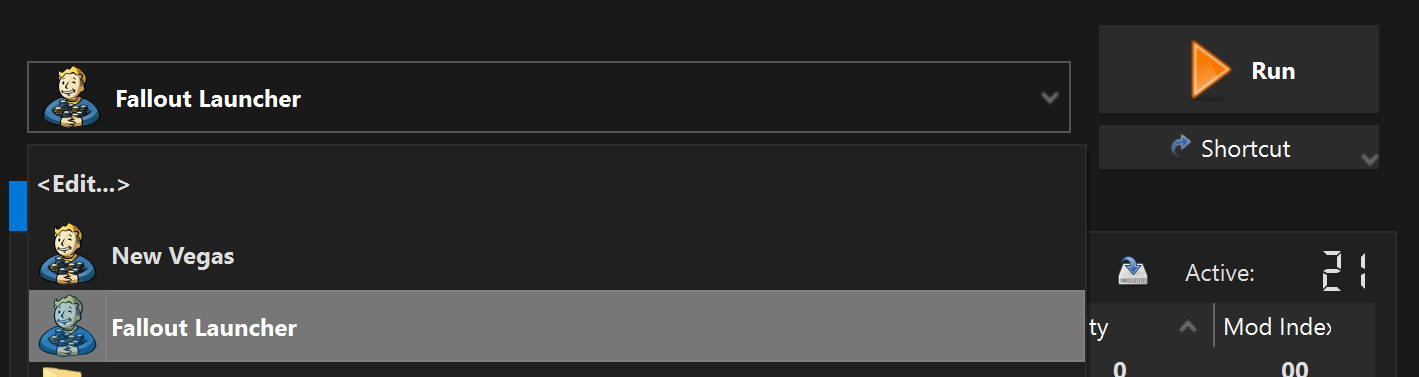
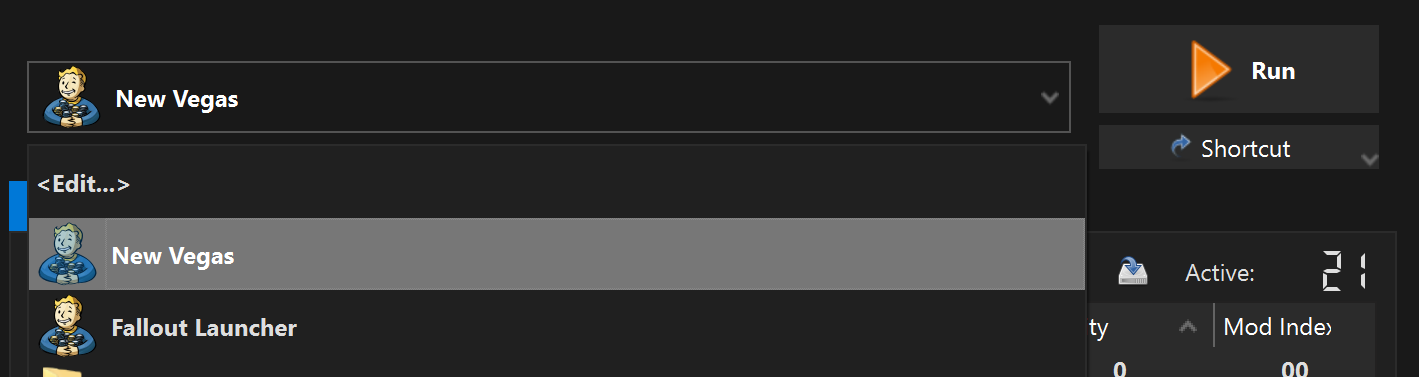
Due to the way Mod Organizer 2 works, running programs through it is a requirement in order to load mods. This is done in the top-right corner of the manager, where the program to run is chosen. Here, select New Vegas, as shown.
For the sake of convenience you may also create a shortcut (right below the Run button) so that you won't have to manually open MO2 each time before playing.
Aren't you supposed to launch through NVSE?
The 4GB Patcher and the Epic Games Patcher both allow the game's main executable to automatically load the script extender.
Refer to the FAQ section for more information and solutions to possible problems you might encounter at this stage of the guide.
Testing Utilities
- Once the game has reached the main menu, wait a few seconds and you will see a message box from the Utilities Checker.
- If any check fails and the comment doesn't help you find a solution, open a support thread in the ModdingLinked Discord server.
Close the game and disable the ML Utilities Checker under the Utilities separator (left pane).
Finishing Notes
Adding mods independently and without the help of a guide is only recommended after you have learned the required information and workflow. These range from general technicalities about the game, to solving conflicts with xEdit through The Method.
You can find sources for all this information and more in the Resources section. You should also be aware of the Tools and Mods to Avoid.
Updating
To update the Viva New Vegas Wabbajack,
- Verify the integrity of your game files in Steam or GOG Galaxy.
- Run Wabbajack again and point it to the same folder where the list is currently installed.
- Once Wabbajack has finished, re-run the 4GB Patcher, and optionally re-run the BSA Decompressor as well (instructions for both are provided above).
Post-update considerations
- Make sure that the update is marked as Safe Mid-Game before playing with the same character!
- Additionally, If you added any mods to the list after installation, add the [NoDelete] prefix to their name in the left pane. Note that they might be moved and/or disabled after updating the list.